Transforming photographs into a circular shape can create visual interest in the boxy world of the computer display. I happened to see this effect recently on one of those poorly made local TV commercials and thought this approach could work well in eLearning design. For instructions on how to crop a photo to a circle in PowerPoint, scroll down for those instructions. For additional ideas on cropping photos, see How to Crop Photos for eLearning.
Doing Photo Research for an eLearning Project
For my project, I wanted to display several small circular photographs showing patients and doctors in varied activities in sync with the narration for an eLearning course. Photo research can be time consuming when you’re looking for something very specific. Particularly because it’s hard to find stock photos of people at work that don’t appear overly staged.
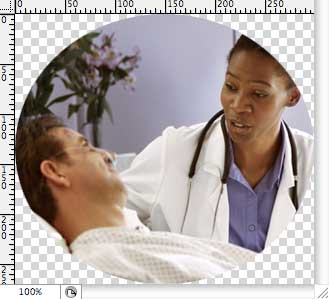
To work in a circular format, the two people would need to be in close proximity. For example, the doctor and patient in the photo below were about as far apart as a small circle could handle.

Find the Focal Point in the Photo
A general rule of thumb for all visual design work is to find the focal point of a photograph before you crop it. The focal point should be based on the concept or idea you want to communicate. In this case, the concept was patient-centered care so the verbal exchange between doctor and patient was most important.

Crop the Photo into a Circle
According to cognitive research, the human brain is good at making predictions. We see what we expect to see. Therefore, it’s good to remember that the mind will fill in missing details. Don’t hesitate to only show a portion of a person or an object as long as the viewer can clearly distinguish what it is. In fact, this can make a visual more compelling than one in which everything is in full view. As you can see below, I had to crop out a portion of each person’s head.

Use the PNG Format for a Transparent Background
Using a graphic editor. Your graphic editor should have the capability to cut out a circle. If you’re not familiar with graphic formats, note that you’ll need to save a circular graphic in the PNG format, which has the capability for displaying a transparent background. The background must be transparent because computer graphics are really displayed as rectangles. See below for what the graphic really looks like in Photoshop with a transparent background.

If you’re having trouble with this, the alternative is to make the background color outside the circle the same background color of the screen on which it will display.
Cropping a Circle Photo in PowerPoint
In PowerPoint, follow these instructions from Microsoft to crop a photo into a circle.
- Use Insert > Picture to add the image to an Office file (such as a Word document, PowerPoint presentation, or an Outlook email message).
- Click the picture.
- Click Picture Format and click the arrow next to Crop.
- From the menu that appears, select Crop to Shape, and then click the circle shape.
- The shape is immediately applied to the image, but a rectangular image might be cropped to an oval. In this case, select Crop again to change how much of the picture fits within the shape you’ve applied.
Place the Photos in eLearning or Slides
There are many ways to arrange circular photos either in a group or as the only photo on the screen. Explore various layouts until settling on one. A non-symmetrical layout will often generate more visual interest. This creates visual tension and is generally more likely to attract the viewer’s eye. It really depends on what you’re going after, however. If you’re trying to communicate a message about stress-free living, then a balanced design might be the best approach.
Here’s what my final layout looked like. Each circular element overlapped the previous one as it displayed. For the fifth circle, rather than use one more stock photo, I placed text in the circle and it displayed exactly when the narrator said those words.
Other Ways to Use Circular Photos
There are so many other uses for circular photographs. They could be a way to introduce characters in a scenario or as a more interesting way to display possible responses to a question. In the latter case, each character would have a speech bubble. Small circular photographs of objects can work as icons in a menu or as mnemonic devices. This article focuses on ways to use circles in design, including circular photos. See Circles in Design.
Conclusion
Cropping photos into a circle shape is a simple way to enhance the visual aspect of a content screen while illustrating a basic concept. To tie things together, I used circular elements for a similar concept illustration later in the course. Repetition of a visual design is a way to unify the overall look.
Also see How to Crop Photos for eLearning.
Photo credit: Hat and camera photo by Afshin T2Y on Unsplash.
Get the latest articles, resources and freebies once a month
plus a Visual Design Cheat Sheet.

Leave a Reply