

Before you send your eLearning on for a quality review, how well do you test it yourself? Doing your own QA or quality assurance testing may seem like an obvious task. Yet too many people pass on their eLearning courses for QA when the work is filled with errors. Within a few minutes, the reviewer or tester can tell it hasn’t been checked for quality and consistency.
Yes, it’s difficult to check your own work and you should never be the only one to check a course prior to final delivery. But, if you respect the time and effort of an editor and/or tester, give it a thorough review first. If you want to improve the QA process in your organization, see Set Yourself Up to Create Quality eLearning.
Don’t Slow Down Production
Failure to do your own QA testing slows down the development process. It creates additional cycles of quality review and revisions. It costs time, effort, and money to deliver an unfinished product for quality testing. And it can generate negative feelings on the part of the tester. Quality testers expect to receive a course that is in very good shape.
I’ll be the first to admit that testing gets old quickly. How many times can you look at the same screens before your eyes glaze over? That’s when it’s time to take a short break and get yourself motivated. Remember that this is an important part of the process.
If you build several hours or a full day of self-testing and revision time into your schedule, it should actually shorten development time. Get your own work as clean as you can before sending it on. Here’s how.
1. Make a Quality Assurance Test Plan for eLearning
For your test plan, think through the course’s structure and the potential paths that a learner may take. Then list all the test paths you will take through a course. If your course has a simple structure, your plan may consist of something like this:
- Run through and select every correct response
- Then select every incorrect response
- Run through the course using the Back button (watch out Storyline 360 users!)
- Return to the menu at different points during the course and re-start
- Select all glossary terms and hyperlinks
- Select every selectable object
- Attempt to move ahead before completing all interactions
If your course has a complicated structure, such as a branching scenario, your test plan could become complex depending on how many potential paths there are. You will need to check each possible navigation path. The test plan might consist of this for the first scenario:
- Run through Scenario 1, Choice 1 and go down that path
- Run through Scenario 1, Choice 1 using the Back button
- Run through Scenario 1, Choice 2 and go down that path
- Run through Scenario 1, Choice 2 using the Back button
- Run through Scenario 1, Choice 3 and go down that path
- Run through Scenario 1, Choice 3 using the Back button
- Quit early and return to the menu, restart
- Select every selectable object
Sounds fun, right?
2. Create and Use an Error Log (Bug List)
Download the test form below or create your own to ensure that none of the issues you find will slip through the cracks. To make your own, create a table with four columns. Use the first column to enter the identifying screen or slide; the second to note the the issue and how it occurs; the third to check off when you’ve made the revision (doesn’t that feel good?); and the last to check off that you tested it and it really was fixed. Click the image below to download this form.
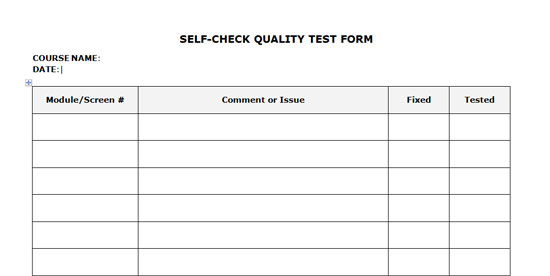
Click to download this self-check form.
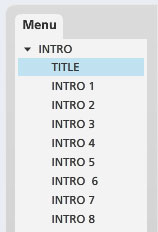
3. Publish with Identifiers
Now you’re ready to start your quality assurance testing. Make it easy on yourself by publishing with unique screen identifiers , as shown on the right. For example, if your finished product will not have a list of screens in a side menu, create a menu just for testing purposes so that you can quickly identify the screen that has a problem. Or insert a temporary identifier at the top or bottom of each slide. You may find that using an ordered list of number identifiers for each screen is the easiest and quickest approach.
4. Run Your QA Test Plan
Now you’re ready to run your quality assurance test plan. Do this at a time of day when you can be very attentive to details. You need to be alert for this task. Keep working through every step of the plan and enter all the issues you find in the log, from a typo to a programming error. Don’t skip any of the paths. If an issue stops the program from working, you’ll need to fix that before continuing. Some typical things to look for include:
- Spelling errors
- Awkward or unclear writing
- Graphics with the wrong aspect ratio (people look like a reflection in a fun house mirror)
- Fuzzy or pixelated images (this means they are low resolution and stretched to size they can’t handle)
- Misaligned graphics
- Graphics that don’t adhere to the Visual Style Guide
- Text that is difficult to read
- Errors in labeling
- Messages pop up at the wrong time
- Interactions not working properly
- Navigation goes to the wrong screen
- Feedback is not appropriate for the selection made
- Test is scored incorrectly
5. Fix It
Make the necessary fixes to the course and check off each one as it is completed. Then do another QA check to ensure every single issue has been fixed and no longer occurs when tested.
6. Rinse and Repeat
Go through the test/revise cycle as long as it takes to get your course into good shape. When it is on solid ground, you’ll be ready to send it onward. Then you can feel confident that you’ve sent out a clean version that won’t take long to test and most likely, the revisions will be minor.
Also see these resources:
- eLearning Quality Assurance
- A Complete Guide on Quality Assurance QA in eLearning Development
- Tips for Quality Control of Online Learning
Leave a Reply