Ever since I spoke to Mike Taylor and Mathias Vermeulen about No Code tools, I’ve been trying out various ones. A powerful website builder that stands out is SpreadSimple, because of its many uses for learning design. For example, I was able to easily and quickly create a learning resource website for a four-week workshop I taught on UX Design for Learning Design to interested members of my Mastering Instructional Design community.
What is a learning resource website?
I created a learning resource website for a four-week workshop I taught on UX Design for Learning Design to interested members of my Mastering Instructional Design community. I’m defining a learning resource website as an online space curated with links to valuable articles, media and tools on one topic. It complements a formal learning program or provides an organized structure for self-directed learning.
In this article, I’ll show you how I used Google Sheets and SpreadSimple to do this. You’ll be amazed at how easy it is. See the resource website.

About Google Sheets and SpreadSimple
As most readers know, Google Sheets is a free spreadsheet application that’s easy to use and accessible from anywhere. One of its uses is to organize information in a structured way.
SpreadSimple is an application for creating e-commerce websites. But it also works for other types of sites. It has a free plan and a reasonably priced Pro plan that offers more features. I found it to be fairly user-friendly and easy to navigate. And best of all—It’s built to work with information organized in a spreadsheet.
I’m sharing the steps I took to create the learning resource website shown above, in case you would like to create one too. It’s easy to modify the instructions listed here to fit your needs. For starters, you’ll need access to Google Sheets and an account at SpreadSimple.
Step 1: Gather the Resource Links You Plan to Use
Gather the online resources you’ll use on the website. In my case, I did the necessary research and reading to find helpful articles and media for every topic in my four-week UX Design for Learning Design course:
- Lesson 1: User Research
- Lesson 2: Pre-Design
- Lesson 3: Navigation and User Interface Design
- Lesson 4: Usability Testing
Step 2: Organize The Information in Google Sheets
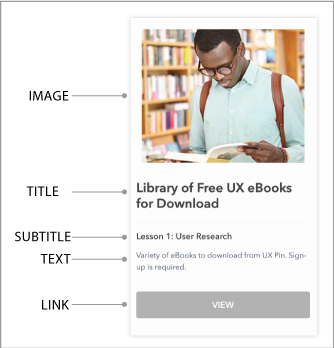
Create a new sheet in Google Sheets with columns for the information you want to include on the site. Each column in the sheet maps to an element of the SpreadSimple website. It helps to know that the website will consist of blocks of information or cards. Each card represents the information for one resource. See the screen capture below to see how I named the columns to align with the information on a SpreadSimple card. (I didn’t do this at first, but revised after learning how SpreadSimple works.)
– How to Get Image Links
Note that images are not required, but it does add visual interest. To display images on your website, SpreadSimple needs a link to an image file hosted online. You can upload images to your web host, another website, or an image hosting site like Imgur, Postimage and Cloudinary. See the SpreadSimple documentation on adding images.
Step 3: Create a New Website in SpreadSimple
- Go to your SpreadSimple workspace and click the plus sign to create a new website.
- Select one of the templates, which at the time of this writing are e-commerce templates. Choose between a list layout or a grid. You can switch between the two later. You’ll end up customizing whatever you choose, but it helps to choose your preferred layout first.
- SpreadSimple will ask to connect to your Google account. After connecting, the application creates a website with data from one of your spreadsheets. If you have multiple spreadsheets, it may not connect to the right one. You can correct this in Step 4 below.
Step 4: Customize the Website
– Overview
– Content Settings: Map the Data to the Card
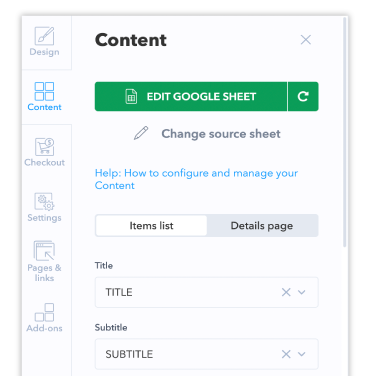
In the dashboard, the menu is on the far left as shown below. Most important for a resource website are the Design and Content settings, each with its own menu of options.
- In Content settings, select the correct source spreadsheet if it’s incorrect.
- In the Items List, select the correct spreadsheet column from each dropdown menu. It will look like this:
- Title: Select TITLE column
- Subtitle: Select SUBTITLE column
- Price: Leave blank
- Text: Select TEXT column
- Image: Select IMAGE column, which should have links to the images you’ve stored online
– Content Settings: Customize the Primary Button
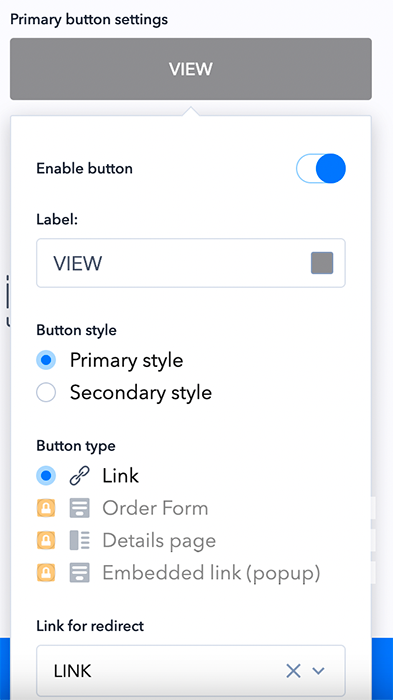
- Continue to scroll through the Content settings to the Primary button settings. Change “Buy” to the word of your choice.
- At the bottom, is a drop-down to select a Link for Redirect. This is where you select the Link Column from your spreadsheet.
- Continue scrolling to select a layout type, called Card style. Your options are a list or a grid. Also select the Card size.
- Be sure to click the blue SAVE button when you’ve made all your selections.
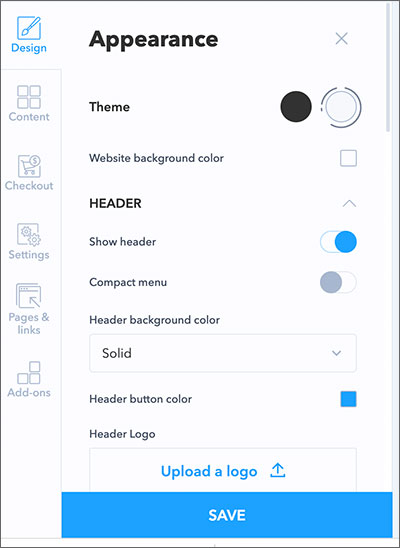
– Design Settings: Appearance Options
Step 5: Publish Your Site
Once you’re satisfied with your site, click the blue PUBLISH button in the upper right. You can specify a subdomain—if it’s available—for the spread.name domain. Although you may have a few things to tweak, the process is quite fast and easy. Every change you make requires you to publish again.
In conclusion, creating a resource website using Google Sheets and SpreadSimple Website Builder is a reasonably fast, easy, and cost-effective way to build a platform that provides information, tools, and resources for building skills and knowledge. With this combination of tools, you can create a professional-looking resource website without any coding or technical skills.
I hope you found this helpful and that you create resource sites that help people explore and learn. Share a link to your learning resource website in the Comments below after you build one so we can all benefit.


Great blog. Have a look at our leading android app development company- AppSquadz