

People learn through experience and one of the best ways to transmit experience is through stories. Once you’ve been sold on the value of storytelling and scenarios for eLearning, you need to consider the best ways to visualize these stories. How can the graphics in eLearning scenarios draw people in and make the story more meaningful?
Most stories and scenarios feature characters in varied situations. Fortunately, people find pictures of other people compelling, particularly faces.
When using character images in an eLearning scenario or story, try to display a new picture for every new action in the storyline. This keeps things moving along. Here are some approaches I like to use. Please share your favorite approaches at the end.
Comic Format for Sequential Storytelling
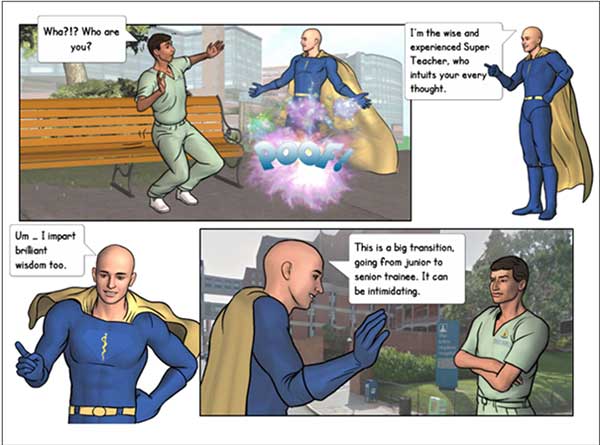
The comic format with several panels on each slide is an ideal graphic for eLearning scenarios because it is a common convention for sequential storytelling. You can use cutout people or hire an illustrator on Upwork, as I did for the example below. This approach comes with features that most people know, such as speech bubbles and expressive lines and sounds, as in the “POOF” below. To read more about this example, see Visual Stories for Learning.
Cutout People for eLearning Scenarios
Another approach is to use stock cutout people. Cutout people that are made specifically for eLearning are superior to typical stock photos because they provide multiple shots of the same model in different poses. This makes it much easier to tell a story in visuals by matching the character’s actions to the narrative. One way to do this is to use a new slide and graphic for every new action in the eLearning scenario.

Scrap Book/Photo Album Format
Although it’s a bit dated, the scrap book effect still works as a graphic approach for eLearning scenarios. Create all of the photos with a white border and place the images in a slightly rotated position. This gives it a casual effect. Also, a diagonal orientation makes an image dynamic. And it gives the sense that the photos were placed somewhat randomly.
When you use this effect, you can progressively build up the photos in sync with the voiceover, overlapping two or three on the screen as the story continues (see the captions example below).
White Border: Younger readers may not remember that at one time, photos developed from film always had a quarter inch white border around them. This graphical convention is still with us today.
In terms of visual language, placing a white border around a photo helps to communicate it is an element of a scrap book or photo album. It’s also a good way to highlight the photo, when placed on a neutral but slightly darker background.

Using Custom Photos. The example above is from a story-based course on patient safety that required custom photos (the model on the right above). Custom photos are necessary when your topic is very specific and you require a unique environment or setting. I recommend using a model with acting experience. See eLearning Photography for tips.
In a course with voiceover, you can take the effect one step further and enhance the story through photo captions. In the screen shot above, the narrator carried the story, but the brief caption gave a bit more information.
Make it Richer with Speech Bubbles
Speech bubbles are tricky, because they can give a course a comic book effect when you don’t want one. On the other hand, they have the potential to add depth to a character.
After some experimentation with this patient-centered care course, I decided that speech bubbles would help me express the character’s inner life. It made the story richer.
The trick was to display the speech bubble with minimal text after the narration ended. Then there wouldn’t be too much information coming at learners all at once.

Illustrated Stories for eLearning Scenarios
Illustrated characters give eLearning stories and scenarios a unique appeal. These have a different look and feel than the cutout people. Use introductory text to set the scene. Then use speech bubbles for to create the storyline.
If you take this route, first identify whether cartoon characters or serious illustrations are most appropriate for your content and audience. When you use illustrated characters, you may choose to use conventions one finds in the comic book format discussed above. For example, the typeface in the graphic below is a comic book font that I bought from Blambot. Also see “Use a Comic Style for Learning” for more ideas on this approach.

Here are some options for finding illustrated characters:
- Design Comics: offers free hand-drawn characters and scenes for download
- eLearning Art: illustrated and photographed characters
- Pixels.market: Free varied illustrations
For more visual design tips, see my book Visual Design Solutions: Principles and Creative Inspiration for Learning Professionals!
Reference:
Schank, Roger. Tell Me A Story: Narrative and Intelligence.
Hi Lee,
I’m not sure how I missed this comment from over a year ago, but thank you for adding the shadows tip. You are absolutely correct that without a shadow, the cutouts look a bit as though they are floating. You can add the shadow in PowerPoint, as you mentioned, or in Photoshop or another graphics tool. Excellent suggestion.
Connie
Hi Connie,
I often use people cutouts, so I want to share a great way to add realism. I copy my character onto a PowerPoint slide where I add a drop shadow and then save it as a .bmp picture. Then I open the image in a graphics editor and cut out the character, leaving only the drop shadow pixels. I trim the canvas and save it as a .png file. Then when I’m building my scene, I add the drop shadow in a layer between the background and my cutout character. This method adds a lot of flexibility if you ever have to re-size or reposition the character. The main thing is that the shadow adds depth to avoid the “floating in air” appearance. ~Lee
There are some great points here! Using effects such as bubbles and borders to enhance images and character scenarios are a great way to help keep the learner engaged in the content.
One of the greatest resources I’ve bookmarked for building such interactive presentations is eLearningstock.com. I can quickly browse by character, scenario, or purpose, and all images and animations are royalty-free. One of my favorites are the ‘knockout people’, where dozens of characters are available in over 150 different poses, communicating a range of emotions and situations.
On top of convenience, a weekly freebie is available from their collection on the site’s blog. I would highly suggest taking the time to check it all out!