
A prototype is a concrete model of a rough idea. Most design fields use prototypes to demonstrate how software, apps and websites will function or look. These days, it is standard to build eLearning prototypes for instructional design too.
A prototype is a demo learning designers use for a variety of reasons. You can use an eLearning prototype to think through a design idea. You can use a prototype to show others how something will function or look and feel. And you can prototype to test ideas and get feedback from users.
In his book, Leaving ADDIE for SAM, Michael Allen points out that too often, people high up in an organization will dictate training needs and approaches for their people. This often ends up in a learning intervention that is irrelevant or uninteresting. By prototyping for the purpose of showing it to learners, you will likely elevate the quality of instruction when you use their input and feedback.
Benefits of Creating an eLearning Prototype
The advantages of prototyping far outweigh the disadvantages. So, let’s start with the benefits. eLearning prototypes can:
- Serve as a cognitive aid to help you implement your varied ideas
- Help you explore an idea in the real world
- Help you find problems early in the design process
- Support an iterative design process
- Enable you to avoid the error of spending time and money on an idea that won’t work (the fail fast concept)
- Communicate how something will work to others who have no idea what you are talking about
- Help users, learners, sponsors and stakeholders get involved in the design process
- Educate sponsors and stakeholders of the rationale for your design decisions and the effort it takes to develop an effective product
Disadvantages of Prototyping
It’s hard to think of disadvantages to prototyping. I am grudgingly listing a few here.
- Prototyping takes time at the front end of a project. (But, prototyping should save time in the long run).
- Supervisors may not understand why you would take the time to prototype, so this could be a disadvantage.
- Fail fast is an axiom of the prototyping approach. but some work cultures aren’t comfortable with the idea of failing. (Hint: Don’t use that phrase.)
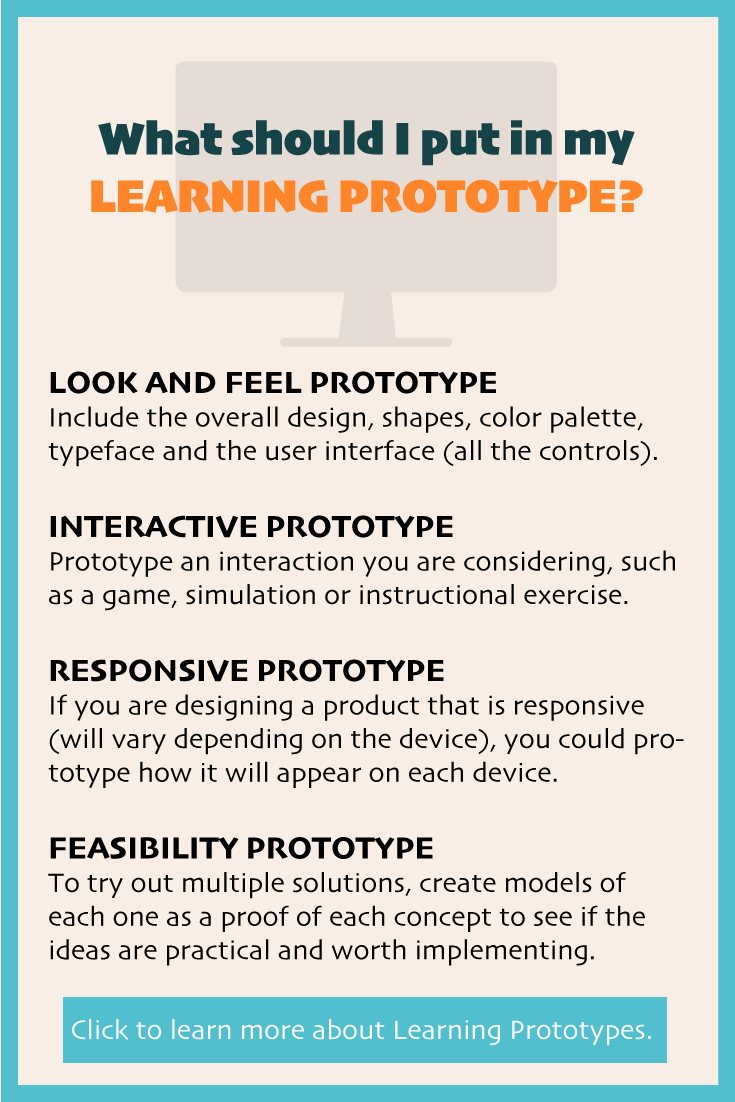
Three Types of eLearning Prototypes
To decide what to prototype, consider what you need to think through, communicate to others or test and evaluate. Let that guide your decision on what to prototype. Remember that you can prototype more than one thing and that you can combine different kinds of prototypes. Here are several types of prototypes and what to include in each one.
1. Functional or Interactive Prototype: What to Include
The purpose of this prototype is to demonstrate functionality in an eLearning product. Consider the core interactive activities that users will complete. Prototype one or more of these interactions. This could be a game, a simulation or instructional exercise. Then ask learners to complete the activity and see how they perform. Include the following items:
- Optional instructional content if this will be needed to complete the activity
- Instructions for completing the activity
- The activity itself
- Feedback or consequences that occur based on the learner’s interactions
2. Look and Feel eLearning Prototype: What to Include
The purpose of a look and feel prototype is to show the user interface and visual design you will be using in a course. Include the following items:
- Layout
- Color palette
- Typeface(s) in several sizes
- Style of images
- Navigation buttons
- Menu
- Other interactive controls
3. Responsive eLearning Prototype: What to Include
If you are designing a product to be used on desktop and mobile devices, you’ll need to test that it looks good and works well on all of those devices. You need the product to be responsive. It’s best to prototype this early in the design process to ensure it’s going to look and function as intended on computers, tablets and phones. One approach is to prototype using a mobile-first design strategies. See this guide to mobile first responsive design. Include the following in your responsive prototype:
- Full topic or lesson with the most complex screens
- Interactions and navigation designed for mobile and desktop
- Smallest font size you’ll be using
- Responsive graphics
What to Include in a Feasibility Prototype
The feasibility prototype is good if you or a team have several potential solutions. Or if you’re not sure that your idea can work. Or if you think it will take too long to implement. You can create a prototype of each idea as a proof of concept to see if it is practical and worth implementing. In this case, prototype the challenge, such as:
- The unique features of your idea
- A small version of the most difficult part (why were you uncertain about it?)
- A short version of the part you thought might take too long to develop
How to Prototype
Your prototypes can range from low-fidelity to high-fidelity. You can also start with a low-fidelity prototype and as you refine it through feedback, move to higher fidelity.
- Paper and pencil. A sketched prototype is an example of one that is low-fidelity. This can be a surprisingly useful way to start. Imagine you were designing a mobile support app. To start, you could sketch the key screens and navigation using a mobile template. As you refine your design from peer and user input, you could then move to a digital format. See Graphic Design Tools for Instructional Designers.
- Wireframe Tools. Wireframes show the skeleton of a user interface or web page without getting into too much detail, other than the placement of controls and navigation. There are many online apps for creating design mockups and many are now enabled with interactive features. I use Balsamiq for web page and mobile wireframes.
- PowerPoint. I think of PowerPoint as a medium-fidelity prototyping tool. Because it has graphic capabilities and can hyperlink to other slides, you can quickly simulate interactivity. Also, PowerPoint defaults to a horizontal slide orientation, which is commonly used in eLearning. Because you can customize the slide size, you should be able to use PowerPoint for vertical prototypes too.
- Authoring/eLearning Production Tools. You have more opportunity to build a high-fidelity prototype using an authoring tool. Experienced prototype designers will tell you to start at a low or medium level of detail at first, and then work your way into a high-fidelity prototype. One advantage of starting out with an authoring tool, is that you won’t need to duplicate the work when you decide on your final design. The disadvantage is that you can dive too quickly into the design details.
- Prototyping Apps. Applications that were designed specifically for prototyping tend to focus on web page and mobile design. Therefore, they may suit your needs if you are designing mobile learning, learning portals and HTML-based courses. You’ll find many reviews of prototyping apps.
Although this article focuses on eLearning prototypes, you can prototype nearly any type of learning or performance support product or event. For example, you might facilitate a brief training session as a pilot for a longer workshop. Or you might curate content for a small group of people as a prototype for a company-wide curation effort. You can prototype job aids or shortened versions of a video or podcast.
What do you include in your prototypes? Answer in the Comments section below.
A prototype can demonstrate interactivity and look and feel better than a storyboard. On the other hand, some people do not storyboard and go directly from multiple prototypes into production, using the same authoring tool. I personally like to storyboard to think through all of the instructional strategies and content. I’d rather make changes to a storyboard than to a programmed product.
The idea of a learning prototype first seems similar to storyboards, but your pointing out other apps and tools should prove helpful with an array of options for instructional designers, to choose from based on their particular learning challenge e.g. project.