

Illustration by Robert Schoolcraft
Over the years of my career, I’ve found that a visual story is the best solution to many design challenges. Perhaps you have discovered this too.
I recently used a visual story approach in a comic book format for a short self-paced lesson on a teaching technique. I thought I would share my experience in case you want to do the same.
This approach might be just what you need for a design challenge you’ll face in the future. See Why You Need to Use Storytelling for Learning for background on the value of storytelling.
Background
Introduction to the Problem: A client wanted to present a 10-minute self-paced lesson to teach an informal instructional technique to medical residents in a teaching hospital. The goal was to help the residents improve the teaching methods they use with junior trainees (interns and fourth-year medical students).
Target Audience: Medical residents were the primary audience, but any faculty member might be interested in the technique.
Audience Characteristics: Medical residents have been through a rigorous education and training regimen. They are preoccupied with patient care and other responsibilities, being extremely busy and under a lot of pressure. In this hospital, there are around 15% more male residents than female. The typical resident is probably in his or her late twenties—I didn’t have hard data on this.
Challenges: In teaching hospitals, residents are responsible for teaching junior trainees in small groups and individually. Many residents are naturally more interested in the study and practice of medicine than in the study of education.
Residents are typically taught in a lecture format in medical school and are very familiar with the lecture approach to instruction. These factors probably influence a resident to rely on giving lectures to trainees, rather than using more effective techniques. We needed a way to grab and sustain a resident’s attention. This was not a required course.
The Process
Before coming up with a solution, I needed to become familiar with the content and the audience. We were working on a very tight deadline (who isn’t?) due to factors outside of our control. Everything needed to be completed quickly.
Rapid Analysis: The client presented me with all of the important content, which I ordered and organized into a logical sequence. Then I wrote learning objectives to reach the goal of teaching the technique, known as a chalk talk. For straightforward projects like this, I often create a two column table to document the analysis. It lists the learning objectives on the left (written informally) and the corresponding content on the right. Here is a sample from one row of the table.
| Learning Objectives | Content |
|---|---|
| 3.0 The learner will identify techniques of an effective chalk talk. 3.1 State how to begin a talk. 3.2 Explain the reason for activating preexisting knowledge. 3.3 Name two ways to activate preexisting knowledge. | (3.1) Set the stage with an informal discussion of expectations expressed as goals and objectives. “Let’s talk about the most common causes of pneumonia.” (3.2) Calling up preexisting knowledge activates the learner’s existing network, creating "hooks" on which new information can hang. (3.3) To activate preexisting knowledge/experience, use back and forth questioning and case-based questioning |
The analysis went through a few rounds of revisions, with a goal of removing anything extraneous. Then a SME reviewed the document and made recommendations. The result was a streamlined set of content, ready for prototyping.
Prototype to Persuade: After considering several options, we agreed that a story depicted in a comic format might be the best treatment for this audience. But my client needed to see a prototype to be sure. He hadn’t seen this approach to eLearning, so he felt a little uncertain. Prototypes (a very short version of a course that demonstrates the approach and the look and feel) are essential for good communication.
I created a short storyboard prototype in Articulate Presenter, using the illustrated characters that come with the program. I found this very convenient for storyboarding. The only character I needed to modify was the superhero who required a cape. To do this, I saved the images I needed to modify as pictures (right-click and select Save as Picture). Then I quickly drew a flimsy cape in Photoshop.
It’s good to remember that the purpose of a prototype is to express an idea, not to create a masterpiece. And it worked. I was given approval to go ahead with my visual story.

Slide 2 of a prototype storyboard for a visual story approach, using the Articulate Presenter characters.

Illustration by Robert Schoolcraft.
Scripting and Storyboarding Under Pressure: The deadline was getting closer. After approval, I quickly started on the script and storyboard. The story starts with the protagonist who is having a problem, shown above. He’s worried about the fact that he doesn’t know how to teach. The script plays on the insecurities anyone would have about teaching with not much preparation for the job. If you need tips for writing stories, check out the excellent advice about writing stories from an interview with Lisa Cron, author of Wired for Story.
Accommodating the Comic Book Format: Because this was going to be in a comic format, I had to make sure the panels would be sized appropriately for the word balloons, text and images. Therefore, I wrote the script in a comic format too, drawing different sized panels on each slide to conform to the size of the text, leaving room for graphics.
After a few slides, I stopped adding characters and wrote the rest out in word balloons. The deadline was tight and I needed to speed up the process. I knew I had provided enough imagery for a talented illustrator (who I had not yet identified) to get the idea. This approach was sufficient for me to determine how to lay out the rest of the story.
See the more rapid approach below. Notice I included some “stage direction” instructions for the illustrator in brackets. Note: The story features two men because our two previous courses featured all women. I believe in equal time.
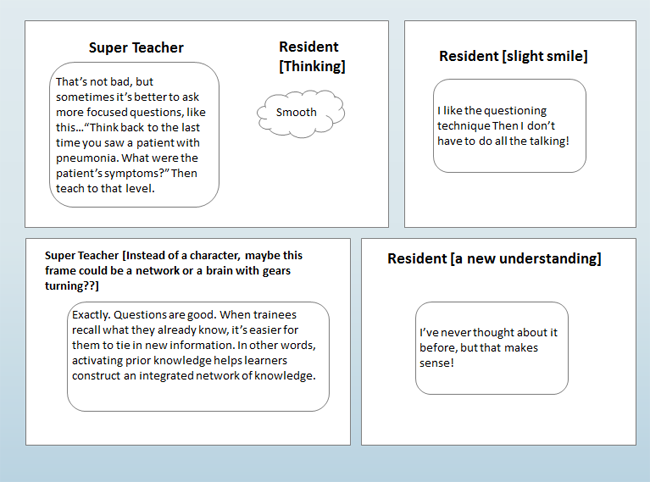
Slide 7 uses a more rapid approach to the script. The clock was ticking.
Wading through Portfolios. Before the script was finished, I posted a job for an illustrator on eLance, which is a site for hiring freelancers in almost any field. I am not a competent illustrator and hiring one was part of the plan all along. Within two days I had 16 proposals. There were two things I was looking for: 1) An excellent illustrator who could render realistic rather than cartoon-ish characters and 2) a reasonable rate.
Fulfilling the second requirement was pretty easy, but I only found one illustrator who could fulfill the first requirement. He seemed talented and in the end, exceeded my expectations. We negotiated dates and he promised me three panels a day, including Sunday. After doing some higher mathematics [number of slides x panels per slide)/3], I saw that we could come in just under the deadline.
In my planning, I allowed time to make a title slide, modify an illustration here and there (if needed), work through a few revisions with the artist that are bound to come up, bring all the artwork into Storyline, arrange and align the artwork, fit in the word balloons, and get it approved by several people. The clock was ticking.
Adding the Artwork: It’s an amazing feeling to see your poorly drawn conceptions and plain text turn into professional artwork, which is what happened when my illustrator started producing three panels a day. Here’s an example of the finished product for Slide 2. Compare the artwork below with the prototype version above. Quite a difference!
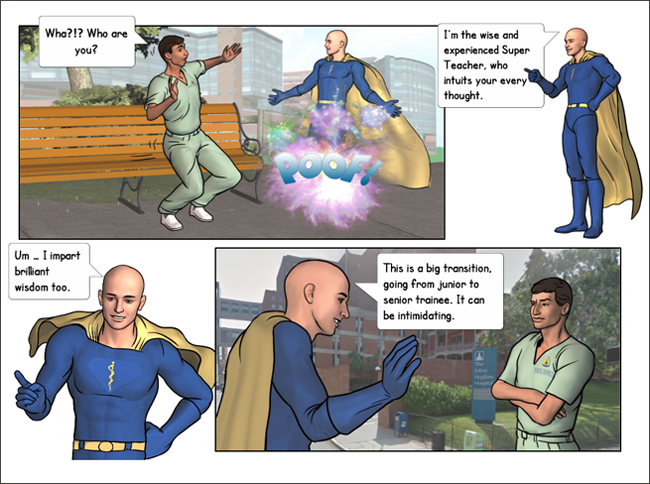
Finished artwork for Slide 2 and inserted into Articulate Storyline. Illustrations by Robert Schoolcraft.
And here is the finished artwork for slide 7, which was shown above in all text.
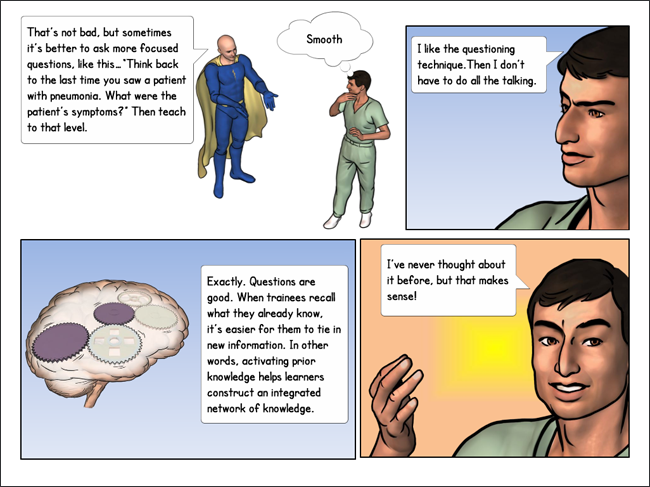
Finished artwork for Slide 7. Illustrations by Robert Schoolcraft.
Conclusion: Although this project was rushed, it fulfilled the instructional objectives. As to how the residents enjoyed and learned from the lesson is another question. I’m waiting to hear back from focus groups on that. What was missing from this too-rapid approach? I should have taken the time to test the treatment on audience members and get their reactions and feedback on the prototype. But, as mentioned, the timeline for this was very compressed. It’s just the reality of the environment we often work in.
Thanks for your comment, Steve.
Hi Connie, really interesting. I particularly like the way you focus on the ‘process’ of creating the learning (due to the tight timescales) rather than just the output. Our customers are also very focussed on continual improvement of their elearning production processes as they realise that shorter production timescales not only make their end clients happier, but also allow them to output a higher number of high quality projects without having to increase the members of their team. (win-win!)
Rebecca,
Your idea sounds great. Including animations within this approach sounds really interesting. I’m glad this helped!
Connie
Connie,
Thank you for explaining your process so clearly. This is exactly what I need for the course I am working on now. A story will work perfectly for teaching how to deal with an active shooter in the classroom. I will use some static screens like you have and incorporate animations and branching scenario knowledge checks to add some interactivity. Thanks for the inspiration!
Rebecca
Hi Donald,
It’s great to hear about your company. I think a lot of people don’t know where to turn to find someone who can illustrate and enhance their instructional content. I am definitely bookmarking your site and I hope others do too!
Connie
Hi Connie,
I’ve been involved in developing comics for education since 2003. I ran a company developing interactive multimedia comics for literacy from 2003 to 2006, was awarded a research fellowship to create my website http:cognitivecomics.webs.com and recently completed my masters doing more research and development on the use of comics as an educational tool. Now that my master’s degree is over I’m looking to build my own comics company but facing the logistics of start up costs, hiring, etcetera.
It’s always great to see information like what you have posted here. I’m happy to correspond with other people who are exploring or developing comics for education.
– Donald Jackson
http://edu-tainmentdevelopment.weebly.com
Hi Valerie,
One advantage is that the information is divided into panels, which naturally chunks it and is good for avoiding overwhelm. I think it’s a viable solution for conveying a message in a brief but appealing format. (I’m writing about this in my upcoming book!)
Best,
Connie
Thanks, Connie! I learned a lot from this. Our organization has been looking at ways to simplify how we convey our message. The illustrated format is very friendly, and I’m guessing this is way less expensive than full on animated video (what we had been considering until we priced it).
Best,
Valerie
Hi Michael,
Thanks for your comment. Oh, you might be completely correct that a quick bullet-point guide would be best. I think that would be good to include as a download. In this case, however, it needed to be online as part of a study. So we’ll see. The sponsors also wanted to make it available to all of the faculty. One way or the other, it is quite brief.
But I am adding one more point. This format provides a lot more than one would get from a bullet point list. It conveys an understanding of the audience, demonstrates nuances in the technique that can only come from representing a conversation between two people, and explains the rationale underlying the steps involved in the technique. All of this without being overly didactic, because it’s part of a story.
Regards,
Connie
Hi Connie,
Thank you so much for this really interesting description of your process.
I do hope you will have time to tell us the results of the focus group testing – I will be interested to hear how appropriate the group feels the comic book approach is in the target audience you have described.
My personal view is that a late 20s, highly educated, time-poor target doctor with clear internal motivation would rather have a quick bullet-point guide with opportunities for further, self-directed reading on aspects where they feel the need for an evidence-base.
But that’s only my view and I’m here to learn, so I have an open mind…
Thanks for all your help
Michael Withers